

- Home
- Companies
- In2Bones Global
- Products
- i2b AlloAid - Model DIP - Engineered ...
i2b AlloAid - Model DIP -Engineered Sterile Allograft for Arthrodesis
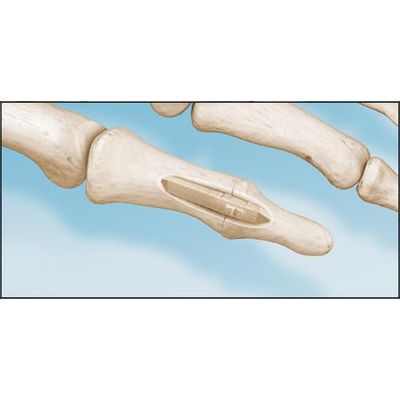
The AlloAid® DIP is a sterile, engineered Allograft. The Allograft is supplied in 2 sizes. The AlloAid® DIP complies with all FDA, AATB and state regulatory requirements for donor screening, recovery and testing.
- Designed with Positioning Ramps to help accurately position the implant and ensure a press-fit.
- Sterile Allograft has conductive properties.
- No post-op hardware removal needed
- Available in 2 sizes.
- This allograft complies with all FDA, AATB and State Regulatory requirements for donor screening, recovery and testing.
The AlloAid® DIP Allograft is designed with Positioning Ramps at the joint line to help accurately position the Implant and ensure a press-fit and reduce the chance of subsidence. The cross-sectional shape and tapered design resist rotation. Tapered ends help with ease of insertion.
The FDA requires traceability from the donor to the recipient. The physician is responsible for completing the recipient records to ensure traceability. As a convenience, pre-printed peel-off labels are included with each allograft. Using the labels, record the allograft tissue identification information in the patient medical record.
Dissection and Joint Preparation
Make a standard dorsolinear incision over the DIP joint. Dissect soft tissue until the DIP joint is exposed. Resect the middle phalanx and remove distal cartilage.
Middle Phalanx Preparation
Drill the provided K-wire into the central part of the canal in the middle phalanx.
Select the appropriate diameter Reamer and Drill over the K-wire advancing until the proximal line of the Reamer is flush with the bone surface, FIG. A.
Distal Phalanx Preparation
Hold Reamer at 90 degrees to the resected surface of the bone and keep it central within the canal. Advance until the distal line of the Reamer is flush with the bone surface.
Allograft Placement
Remove the AlloAid® DIP Allograft from the sterile package. Insert proximally using provided Forceps. FIG. B, taking care not to squeeze the Allograft. Holding the Allograft at the transition, FIG. C, Apply slow, steady pressure until the Allograft is fully seated.
Allograft Placement
Manually reduce distal phalanx over the distal end of the AlloAid® DIP Allograft until the distal phalanx is fully reduced. Reduce directly over the Implant; do not twist on.
Closure Using Surgeon Preference
NOTE: The AlloAid® DIP Allograft does not allow for the immediate resumption of activity by the patient. The surgeon must determine the length of time (approximately 6 weeks) required to accomplish a fusion and inform the patient regarding activity levels during the healing period. Patient compliance during the healing period is critical for a successful outcome.